- Home
- Compare Systems
- Cheap Systems
- Free Quotes
- DIY Systems
- Hardwired Systems
- Wireless Systems
- Smoke Detectors
- Medical Alarms
- Alarm Monitoring
- Cameras & Video
- Ademco
- ADT Security
- Brinks Security
- Broadview
- DSC Security
- FBI Alarms
- GE Security
- Honeywell
- Link Interactive
- Monitronics
- Moose
- Napco
- Protection 1
- Radionics
- Simplisafe
- Alarm Manuals
- Alarm System Parts
- Alarm Tools
- Troubleshooting
- FAQ
- Glossary
- Sitemap
- About Me
- Contact Me
Using a Continuity Tester
for Alarm Installation and Service
A continuity tester is probably the most underrated tool I know of in the alarm industry. As simple as these devices are, they do certain jobs better than any other tool available. And, they do it cheaply!
Testing for continuity is done constantly in all types of electrical work. It’s often done in alarm work simply to check for a complete circuit between two points. For example, it will verify whether or not there is a good connection between a security panel and a magnetic contact.
Why Use a Continuity Tester?
So, why would an installer or home hobbyist need one? After all, even the most basic of digital multimeters (DMM’s) often have their own built-in continuity test function. Why would you need yet another one?
I’ll answer that in a second. First, let me tell you how I use a stand-alone continuity meter.
I find beepers most useful for a few specific alarm tasks:
- ”Ringing out” and labeling wires during a new system installation
- Troubleshooting existing wiring or contacts that are causing intermittent false alarms or other problems
- Checking make/break gaps when installing switches mounted in unusual locations, like the hinge-side of a door or in a steel door.
An audible continuity
tester is much more helpful for these situations than a visual
indicator, such as an LED lighting up or an analog or LCD meter display.
Whenever you can’t be close enough to see the meter display, an audio
tone adds a huge advantage.
Now,
back to the question I asked earlier: Why would you need one? Why
bother buying or making a continuity tester? Why not just use the
built-in continuity beeper in your DMM?
Advantages of a Loud Continuity Beeper
Volume
The main reason is volume. A loud continuity tester is necessary if you expect to hear it from any distance. The tiny buzzer or beeper in a DMM, and even in most commercial continuity testers, cannot be heard across an average-sized house or building. That loud volume is just what is needed for some common alarm chores, including “ringing out” wires during installation.
Response Time
Both analog and digital multimeters often have a slow response time when a voltage or resistance changes. Some LED displays can also have a small lag time of their own, due to the driver circuits that make them operate.
This makes it hard to know the difference between
when a circuit has actually opened or closed, versus when the tester
itself has responded to that change.
Adjusting the magnet to trip a switch in the hinge-side of a door shows how important this can be. To set the magnet correctly, you need to know exactly where in the door swing the switch is being closed or opened by the magnet.
A
simple continuity tester, with none of the processing circuitry of a
DMM, will respond to changes almost instantly. This allows you to know
precisely when a switch changes from open to closed, and lets you
identify wires by briefly shorting them out at the other end.
The fast response time also makes service problems like a sticky, frozen, or intermittent switch show up quickly.
How to Make a DIY Continuity Tester
The decision to make or to buy a continuity tester/beeper is practically made for us. There are very few commercial continuity beepers sold that are just beepers; most also combine other functions like voltage or current testing.
These
other functions are usually better handled by a digital multimeter, so
they aren’t really needed. The extra functions also drive the price up
very quickly.
And, much like the audible continuity test feature
of many digital multimeters, most commercial continuity beepers aren’t
nearly loud enough for our purposes.
For me, these factors make it an easy choice to build my own continuity beepers.
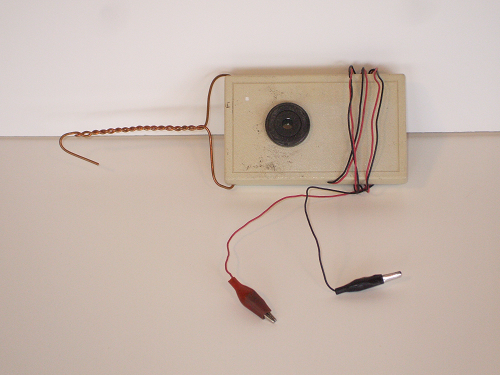
The
components for a continuity tester with buzzer or beeper consist of
little more than a sounding device (usually a piezoelectric beeper) and a
battery. Add a pair of test leads with alligator clips, and a case to
put it all in, and you’ve built a DIY continuity tester.
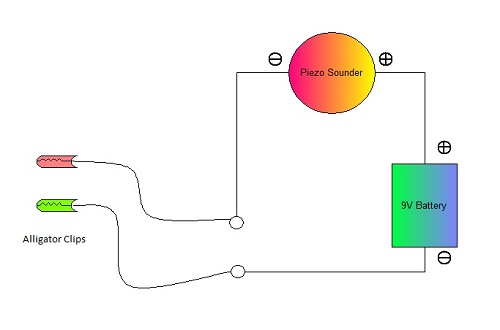 Diagram of a Continuity Tester Circuit
A continuity tester circuit is incredibly simple, so much so that once you’ve built one, you’ll probably never need to refer to one again. Above is a continuity tester circuit diagram I made, in case it helps. I’m sure it took me longer to create the diagram than it would have to actually build the tester!
Speaking of which, I’ve built many
homemade versions of continuity beeper over the years, and there is no
end to the possible ways they can be assembled.
Several of the
beepers I’ve made have used a dual-tone piezo sounder module from Moose
Security Products. When powered by a 9-volt battery, it is piercingly
loud, and can easily be heard across even a large house. In fact it’s so loud, that I had to put a piece of electrical tape over the sounder
opening when using it nearby.
That
exact module is no longer made, but luckily, there are now many, many
more options available in loud piezo sounders. For example, the
Megatronics piezo unit shown above operates on DC 6-12V, and gives a
loud 80dB signal.
Using a Continuity Tester to Ring Out and Label Alarm Wires
Unless you label door and window wires during the prewire phase,
you’ll need to identify them during the installation of the alarm panel.
A loud continuity beeper makes this easy.
There are two ways to do this, depending on whether or not switches are already installed or not:
If switches have not been set:
1) Connect the leads of the continuity beeper to the 2 conductors of the first door or window wire. I like to start at the front door, for reasons I’ll explain in a minute.
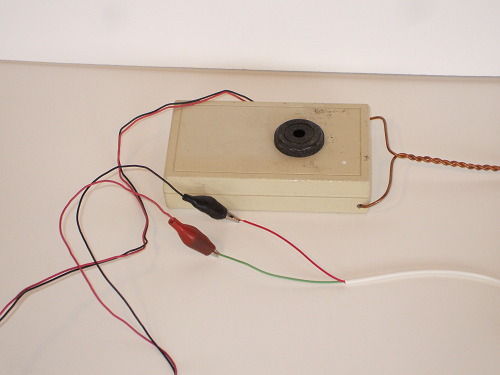 Audible continuity tester connected to first wire
2)
At the main panel location, separate all expected and suspected
door and window wires into a bundle, and tie strap them together. Make
sure to tie them off at least 2-3 feet up from their ends.
3)
Using your wire strippers or diagonal cutters, begin snipping off the
very ends of the wires. To save time, I snip off 4-5 wires at a time. At
some point, your cutters will briefly short out the target wire as they
cut through both conductors, causing a short chirp from your beeper.
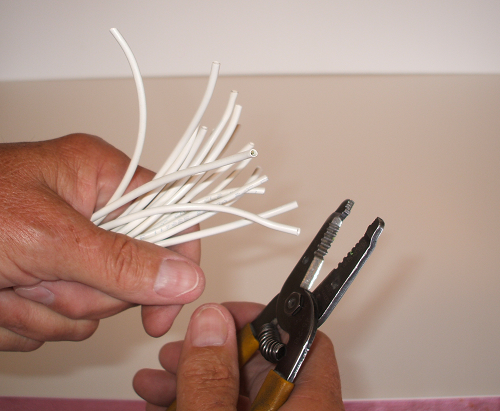 Snipping wire ends while listening for chirp from continuity tester
4)
Once you get a chirp from your continuity beeper, separate out the few
wires in that bunch, one at a time. Keep re-snipping the ends and
following the chirps until you narrow it down to a single wire that
beeps. This is the wire to your first opening.
5) Place a
wire label on the wire, at some point just below the tie strap, and
well above the wire ends. Note the number and the name of the opening
(Front door, east bedroom window, etc) on a sheet of paper, which will
soon become your wire label list for the job.
6) Move the
continuity beeper to the next wire, and repeat the snipping of ends at
the panel location and listening for chirps, until you find the next
wire. Label it, and move on to the next opening.
If switches have already been installed:
- At the alarm panel location, bundle all suspected door and window wires separately from other panel wiring. Use a zip tie to make them easier to handle.
- Strip off about 4” of outer jacketing from each wire, and an inch or so of insulation from each individual conductor. For this example, let’s assume the conductors are red and green.
- Collect all of the green conductors into a bundle, and twist the bare copper ends together. Connect one clip lead of your continuity tester beeper to the bare copper bunch of green wires.
- Check for shorts (continuity) on any wires by dragging the other clip lead of the continuity beeper across all of the bare ends of the red wires. None should beep; if any do, tie a loose knot in those conductors, and keep them away from the other red wires for now.
- Close the first door or window you need to ID, if magnets are already set. Otherwise, install a magnet on the first opening, and make sure it’s closed.
- Swipe the free test lead of your beeper across all of the red wires until you hear a beep. Separate the red wires and retouch them to the test lead until you isolate the one that beeps.
- Place a label on this wire, up near the tie strap. Write the number on a sheet of paper, along with the name of the corresponding opening.
- Repeat the steps (of closing the opening, or installing a magnet) for the next openings. For each one, use the free lead of the continuity beeper to find the beeping wire, separate it, and label it.
- If you close an opening and can’t find a wire that beeps, it may be one of the wires that was shorted out in step 5. Touch these wires until you find the one that beeps; then open the door or window to make sure the beep goes away.
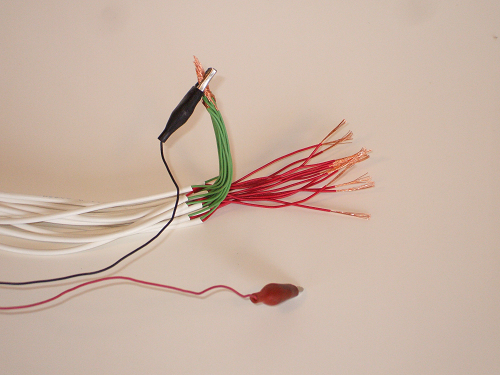 Continuity beeper connected to all green wires twisted together, ready to swipe across red wires to find the short
When you’ve identified all of the wires that go to each opening, you’ll have a complete wire label list. This will make wiring the zones at the main panel much easier, and provide a written record that will save time and effort during future service work.
For systems with alpha keypads that can display words, this list will provide zone description text to program into the system.
To help you create this list, download a free copy of my Basic Alarm Zone List.
If you’re a professional alarm technician or DIYer, download a free copy of my Alarm Installation Record Sheet.
Tech Tips:
- This process obviously goes quicker if you have a helper to move the beeper, or close the openings after you ID each wire.
- Wires can often be shorted when you first begin because of a sloppy cut during the prewire stage that left a bit of the copper from the two conductors touching. As mentioned above, skip over these wires until you’ve ID’d all of the unshorted wires, then retest the shorted ones.
- Naturally, the snipping process in the first method will leave all of your wires at different lengths. No worries; just trim all of them down to a convenient length before connecting them to the panel terminals. This is the reason for tie-strapping the bundle 2-3 feet up from the original ends.
- You have to have at least a little extra length on the wires to use this method. This should be allowed for at the time of prewire, and leaving extra length, or a “service loop”, is recommended practice during any wiring job.
Once you’re used to using either of these methods, you’ll save even more time by using a couple of easy shortcuts. For example:
You don’t have to write down the numbers and opening names as you go, if you are careful. I always start ringing out the wires in any home with the front door wire, and move the beeper from opening to opening in a circle, being careful not to skip any openings.
And, I only
write down the first number from the label packet. Once all
openings have been ID’d, I fill in the remaining numbers on the list, up
to the number of the next unused label due up in the packet. Then, I
just walk around the house in a circle, starting with the front door,
and write down the names for each opening.
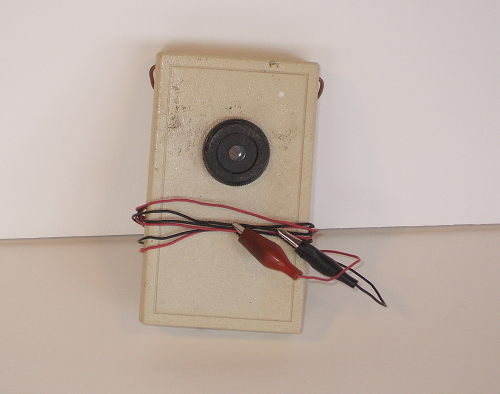 I built this homemade continuity tester with no “On/Off” switch, so I just need to take care to stow it so that the alligator clips can’t touch
Conclusion
A homemade continuity tester is cheap and easy to
make, and is a great addition to any alarm tool kit. If you don’t want
to go to the trouble of making one and prefer to buy one, make sure of
two things:
- That it’s loud enough for your intended use
- That it responds to a short circuit on the leads instantly
I
think every hobbyist, DIYer, or professional alarm technician should
have a continuity beeper, whether you buy it or build it yourself.
They’re not just handy; they can save you real time and effort during
installation and troubleshooting.
Related Articles:
Wire Stripper Tools, Cutters, and Crimpers
The All in One Screwdriver and Other Useful Screwdrivers
The Digital Multimeter as an Alarm Installation Tool
Using a Tone and Probe Kit for Finding Cut Alarm Wires
MagLite LED Flashlight and Other Small Flashlights
Electrician Tool Pouch And Other Tool Bags and Buckets
Not sure you have the skills needed to install an alarm system yourself?
Or, do you have plenty of skills, but not enough time?
I understand completely. These are two of the reasons I’ve partnered with BuyerZone. Using their connections with alarm dealers across the country, you can quickly get free alarm quotes from companies in your area.
Just answer a few easy questions below, and you’ll receive your free price quotes shortly.
Try it now!
Return to Alarm Installation Tools from Continuity Tester
Return to Home Security Systems Answers from from Continuity Tester
Note: Feel free to print any of the articles on this site for personal, non-commercial use. Just look for this button:
If you found this website especially helpful, you might want to consider making a small donation. Since 2011, AzAlarmGuy has been providing free help and advice on home security systems to all of those in need.
Your gift, in any amount, will help me keep this website a free resource for anyone needing help with alarm system issues or questions.
Disclosure
I receive affiliate commissions from some of the companies and products I discuss. These commissions don't change the price that you pay.
Rest assured that this compensation does not influence my recommendations. I only endorse products and services that I truly believe to be an honest value for you, as a visitor to my site.
For more details, see my full disclaimer.


