- Home
- Compare Systems
- Cheap Systems
- Free Quotes
- DIY Systems
- Hardwired Systems
- Wireless Systems
- Smoke Detectors
- Medical Alarms
- Alarm Monitoring
- Cameras & Video
- Ademco
- ADT Security
- Brinks Security
- Broadview
- DSC Security
- FBI Alarms
- GE Security
- Honeywell
- Link Interactive
- Monitronics
- Moose
- Napco
- Protection 1
- Radionics
- Simplisafe
- Alarm Manuals
- Alarm System Parts
- Alarm Tools
- Troubleshooting
- FAQ
- Glossary
- Sitemap
- About Me
- Contact Me
Smoke Alarm Circuit Troubleshooting
How to Test Wiring at the Main Panel
Having trouble with a smoke alarm circuit? If you have a home security system and your keypad is showing a fire alarm problem, you have a few options.
If an alarm company currently monitors your system, you should have them track down and fix the problem. Working on the system yourself could void your warranty.
Also, your alarm company technician is familiar with the type of system you have, and is used to dealing with issues like this. He/she will also have access to a log of signals sent by your panel, helping to accurately pinpoint the problem.
If you have a fire alarm beeping, but the alarm keypad is clear, chances are that it’s not part of your home alarm system.
The
beeping unit is most likely a 110-volt smoke alarm with a failing
battery. See how to handle the situation here: How to Stop a Beeping
Smoke Alarm.
If you’re pretty sure the problem is with a smoke detector tied to your security system, you may want to try locating the problem yourself. If you’re a handy person, a home security DIY type, or an aspiring alarm technician, I can walk you through the troubleshooting process. You’ll need an analog or digital multimeter to measure resistance and voltage, wire strippers, and possibly a ladder to reach your alarm panel and smoke detectors.
Troubleshooting smoke detector problems is a 2-part process:
This page covers the first part, checking connections inside the panel. This is the point where the wiring connects to the smoke alarm circuit.
The second part is Troubleshooting Smoke Alarm Wiring at the detectors. You’re more likely to find issues with wiring and/or smoke detectors than with the main panel itself.
These steps can be done in either order, as long as you keep track of your findings at each location. This page deals with the main panel connections.
For details on connecting fire alarm zones, see this page on smoke detector wiring. For more on fire zones themselves, see Smoke Detector Circuit Basics.
For information about maintaining smoke alarms, see System Sensor Smoke Detectors, Cleaning and Testing.
If your system is monitored, be sure to call the central monitoring station and put the alarm on “Test” for an hour or two.
Also, disconnect one wire from the siren output terminals. This will save your ears in case you accidentally trip the smoke alarm circuit while testing.
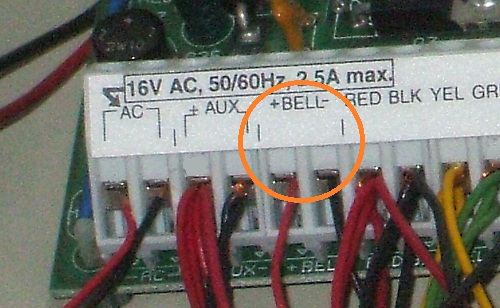
Some brands of security panels, like DSC, supervise the siren wiring. This means disconnecting the siren will put the panel into a “trouble” condition, causing the keypads to beep. This is normal, and can be ignored, or you can press any key or enter your code to silence the beeping.
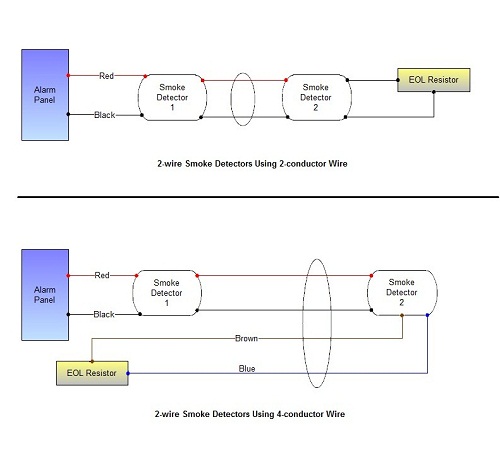
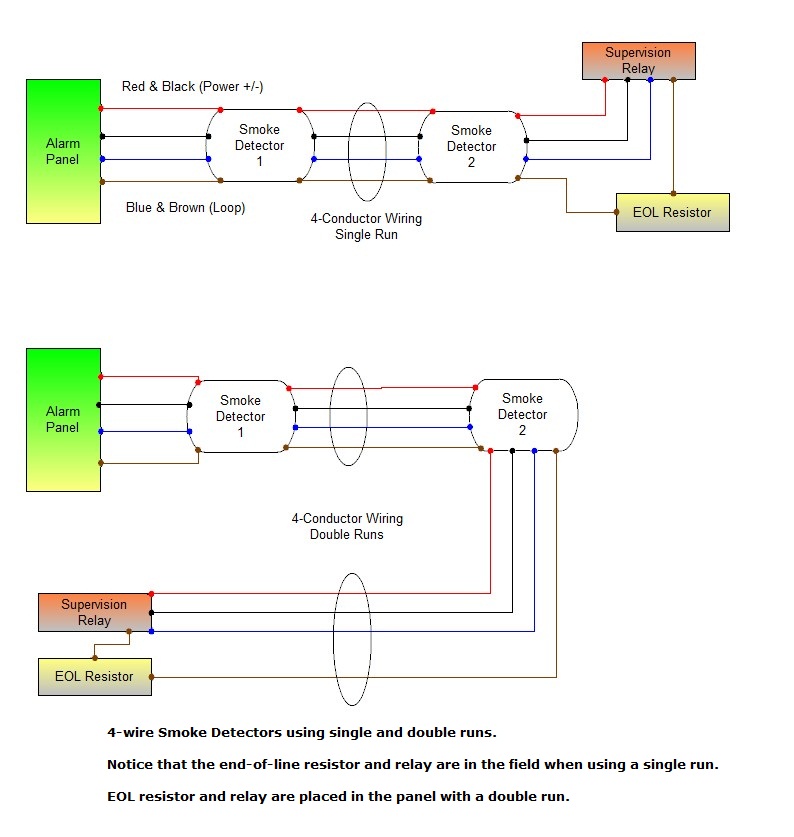
Find the smoke alarm circuit terminals on the panel, and determine whether you have 2 wire or 4 wire smoke detectors. Check the decal inside the panel lid, or the installation manual for your system. It will show the smoke terminal locations, as well as the hook-ups for the type of smoke alarms that can be used.
If it shows only one kind or the other, you've got the one shown. Some panels are only able to support a single type of smoke detector.
If it lists both 2- and 4-wire smokes as being compatible, then you could have either kind. In that case, check the wire that connects to the loop terminals. If it is 4-conductor wire, see if the other 2 conductors tie to “power” terminals on the panel. If they do, your home has 4 wire smokes. If not, they’re the 2 wire variety.
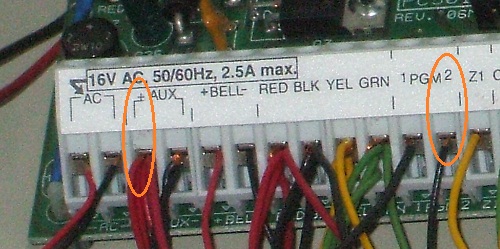
If you have 2 wire smoke detectors, you’ll just have a smoke loop to meter. In case you have 4 wire smoke detectors, you’ll need to meter both the smoke loop and the smoke power terminals.
Metering the Smoke Alarm Circuit at the Panel
Disconnect the smoke loop wiring from the main panel. Make a note of which color wire is connected to which terminal, and then loosen both terminal screws. Remove the wires, being careful not to touch the bare wires to any part of the circuit board.
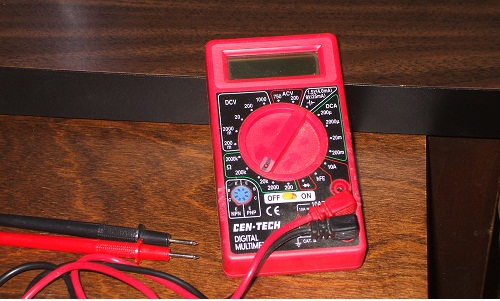
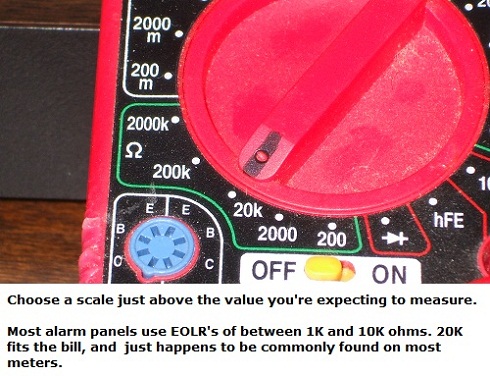
Connect a probe of your multimeter to each of the wires. Set the meter to measure resistance at a scale of 20K ohms or so.
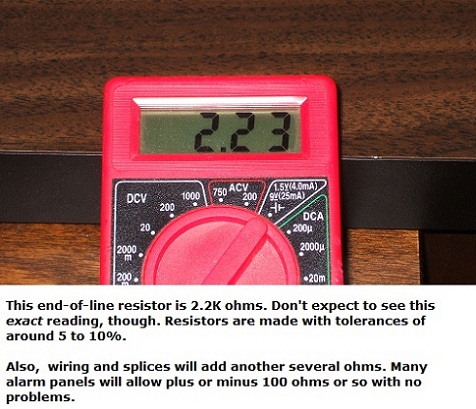
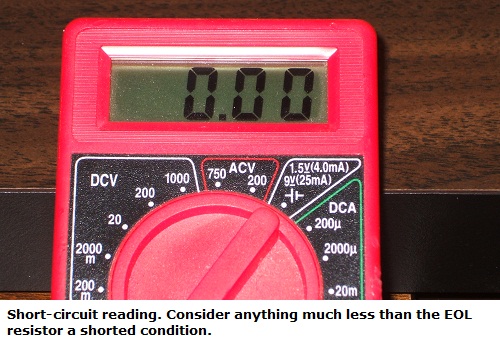
Wait for the display to stabilize, then check the resistance value shown. Three results are possible:
1. The reading is equal or nearly equal to the value of the end-of-line resistor. If so, then the panel is “seeing” the EOLR.
2. The reading is less than a few hundred ohms, possibly near zero. This indicates a short circuit on the smoke alarm wiring.
3. The reading is very high, or the display shows “OL” (over limit). The wiring has been cut or pulled loose (open circuit).
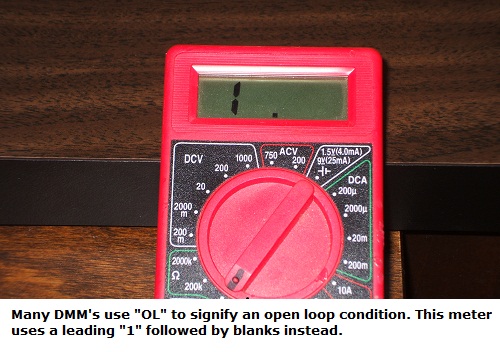
Next, check for a possible ground on the smoke alarm circuit. Connect a meter probe to each wire, in turn, and touch the other probe to the “ground” or “earth ground” terminal on the panel circuit board. If there is none labeled ground, touch the probe instead to a bare part of the metal enclosure. A screw that fastens the board to the enclosure will also work.
The reading should be very high, or “OL”. If it’s not, there is at least a partial ground on the corresponding wire.
Metering the Smoke Power Terminals
Set your multimeter to the DC Volts scale, set to a range greater than 12 volts. Touch a probe to each power terminal on the panel, red to positive, black to negative. Your meter should read something near 12 volts, give or take a volt.
If not, test your meter settings by touching the probes to the positive and negative battery terminals. If you get a reading there, your meter is set correctly. If not, check the meter for correct range and scale. Also check that you have the correct terminals identified on the circuit board.
If there is still no power at the terminals, the panel may have a blown fuse or bad power supply circuit. See the diagram inside the lid or the installation manual for fuse locations, and replace if necessary.
After checking everything inside the main alarm panel, complete the troubleshooting procedure by checking connections in the field.
If you haven't done so already, get a few Free Home Security Systems Quotes from companies in your area.
This will give you a good idea of what it would cost to have a system installed, as well as how much you could save by doing it yourself.
Return to Home-Security-Systems-Answers from Smoke Alarm Circuit Troubleshooting
Return to Hardwired Home Security Systems from Smoke Alarm Circuit Troubleshooting
Note: Feel free to print any of the articles on this site for personal, non-commercial use. Just look for this button:
If you found this website especially helpful, you might want to consider making a small donation. Since 2011, AzAlarmGuy has been providing free help and advice on home security systems to all of those in need.
Your gift, in any amount, will help me keep this website a free resource for anyone needing help with alarm system issues or questions.
Disclosure
I receive affiliate commissions from some of the companies and products I discuss. These commissions don't change the price that you pay.
Rest assured that this compensation does not influence my recommendations. I only endorse products and services that I truly believe to be an honest value for you, as a visitor to my site.
For more details, see my full disclaimer.
