- Home
- Compare Systems
- Cheap Systems
- Free Quotes
- DIY Systems
- Hardwired Systems
- Wireless Systems
- Smoke Detectors
- Medical Alarms
- Alarm Monitoring
- Cameras & Video
- Ademco
- ADT Security
- Brinks Security
- Broadview
- DSC Security
- FBI Alarms
- GE Security
- Honeywell
- Link Interactive
- Monitronics
- Moose
- Napco
- Protection 1
- Radionics
- Simplisafe
- Alarm Manuals
- Alarm System Parts
- Alarm Tools
- Troubleshooting
- FAQ
- Glossary
- Sitemap
- About Me
- Contact Me
Magnetic Reed Switches
Removal DIY
Magnetic reed switches are the most common devices used in modern
alarm systems. Also referred to as magnetic sensors or contacts,
these devices tell a security panel when a door or window is open or
closed.
Reed switches consist of two metal strips sealed inside a glass tube and attached to external wire leads. When a magnet is brought close to the unit, the strips are deflected and touch, closing an electrical circuit. The alarm panel then senses this closure.
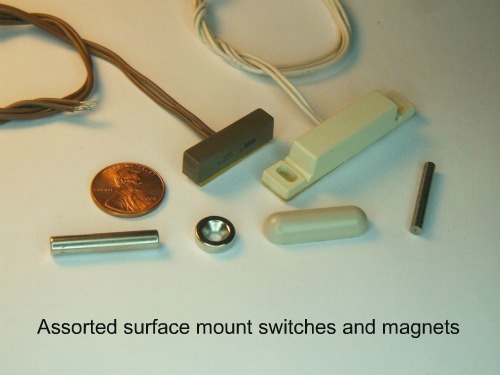
Magnetic reed sensors come in a variety of shapes and sizes. They are
packaged in a plastic case designed for different mounting
options. Reed switches can be recessed or surface-mounted, and come in
several colors to match doors and windows.
Window and Door Replacement
With energy costs going up all the time, many people are looking
for ways to save money long-term. Switching to more energy-efficient
windows and doors is one of the best ways to do this.
New windows mean that all of the magnetic reed switches and magnets must be removed from their frames. Once the old windows are removed and the new ones installed, the sensors and magnets must be properly re-mounted.
Your alarm company would probably charge you hourly for
open-ended work like this. Magnetic reed switches are not expensive, but
the labor to remove and re-install them can be.
An “easy” house might take an alarm company two or three hours
for removal of the contacts, and likely longer than that for the
re-installation. They would also have to build two trip-charges into the
mix. Not terribly expensive, but it’s money you’d probably rather spend
on something else.
Ready for some good news?
This is probably one of the very best do it yourself alarm system
projects for a relative beginner. A reed switch is fairly easy to
remove and install. The job requires no experience, a small time
commitment, and only the most basic hand tools. (Some situations may
require a cordless drill). The heavy lifting has already been done,
since everything is installed and working before you even start. You’re
simply re-locating things.
Here are step-by-step directions showing you how to do this. If you’re the type who likes to look at pictures, I’ve included lots of breath-taking photos, too….
Removing the Magnetic Reed Switches and Magnets - Surface-Mount Type
Take down any window coverings first. These come in a wide variety,
from plastic and wood blinds to custom-built shutters and more.
Most mini-blinds have hinged release points on each end bracket. If there is a center bracket, it is often a snap-in affair. Be patient, and always remember: If something can be put together, it can always be taken apart!
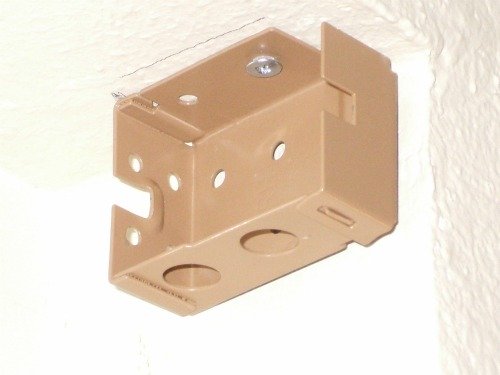 Mini-blind bracket in closed position. Release tab is at the lower-right corner of the bracket.
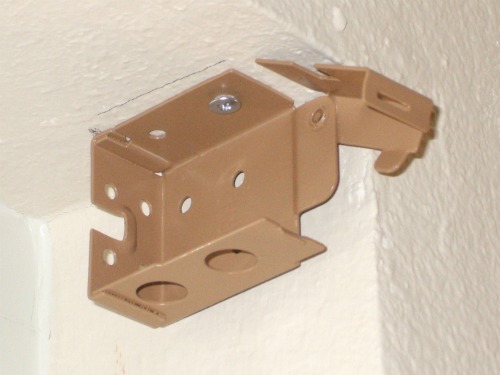 After releasing the tab, the front of bracket can swing up to allow removing or installing the blind head rail.
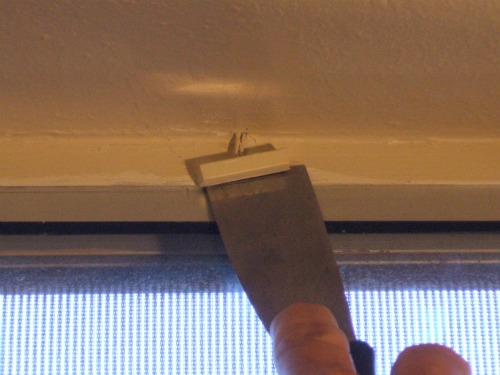
Gently pry the magnetic reed switches and magnets loose using a putty
knife, the thinner and more flexible the better.
Switches and magnets
are usually attached with screws or double-sided tape, but may also have
silicone sealer or caulking too.
Magnets can take some pretty rough handling, but be careful with the sensors. The glass tubes inside magnetic reed switches will break if you use too much force.
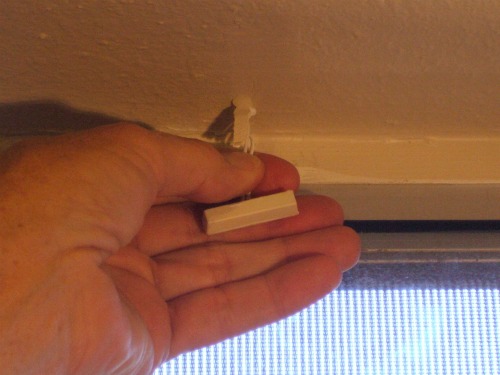
After removing the contacts, leave any adhesive tape on the
parts. Use it to stick them together, adding some masking tape to make
sure they don’t separate. Two reasons for doing this:
- It will keep the alarm circuit closed, allowing the rest of the alarm system to be armed as usual. Any doors or windows you aren’t changing out will continue to be protected
- It keeps the magnets from getting lost
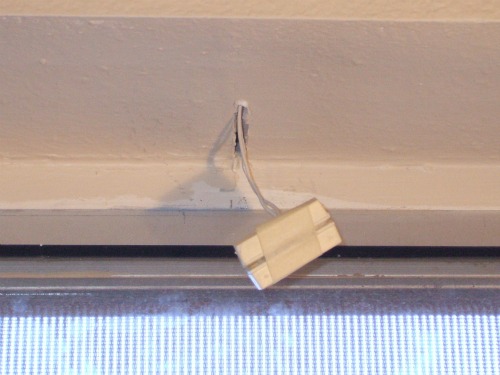
Pull some extra length on the wiring coming from the wall.
If there was a
notch cut into the drywall during the original installation, it would have been covered with drywall patch. Remove
some of this patch from the notch.
This allows more room for the new window frame, which will almost certainly be thicker than the old one. Grip the wires themselves, not the plastic case, or you might pull the leads out of the switch.
Removing the Magnetic Reed Switches and Magnets - Recessed Type
Recessed magnetic reed switches are most often used on doors, as shown in this example. If you have any recessed contacts installed in your windows, the removal procedure is the same.
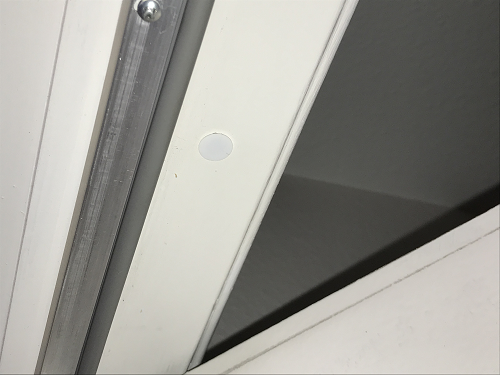
First, try lifting the switch out of the hole by prying along the edges with a thin screwdriver or putty knife. Pry gently, working around the perimeter of the switch to avoid damaging it. This will cause most switches to loosen and come out fairly easily.
If you find any that won't come out by prying, you may have no choice but to drill it and drive in a screw to pull it out. Of course, this destroys the switch, but is sometimes the only way to gain access to the wire so you'll be able to install it into the new door (or window) frame.
To do this, drill a small (1/8" or so) hole into the center of the magnetic reed switch. Drill in about 1/2" deep.
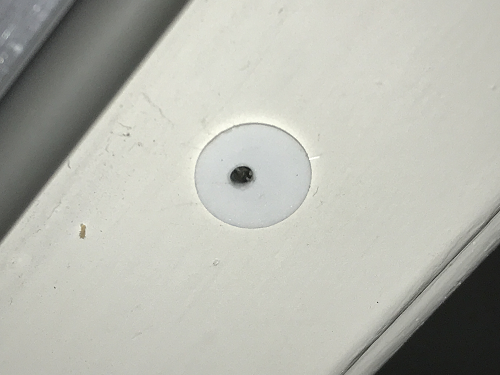
Next, drive a small screw (drywall screws work fine) into the hole on the switch until it feels snug.
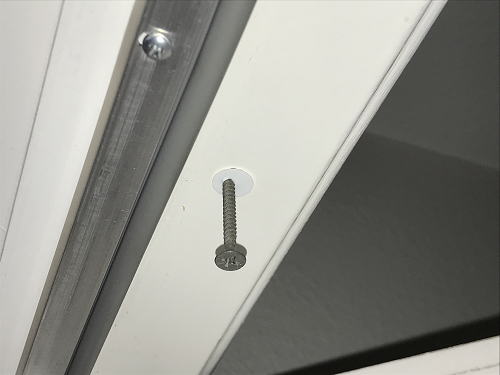
Use a pair of pliers to grip the screw. Then, pull steadily while rocking the pliers from side to side or in a circular pattern. Slowly, the switch will come free of the hole.
If the screw pulls loose from the switch, drill into the switch a little deeper, then thread the screw in again until it feels tight. Repeat the pulling and rocking until the switch is free.
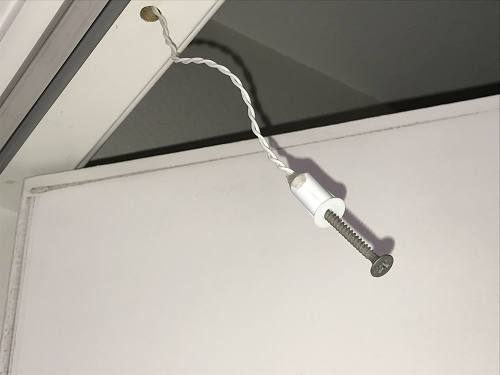
Remove the magnet from the door by prying it out with a putty knife. Tape the magnet to the switch just like you did with the window switches. If you have any magnets you can't remove, tape a spare loose magnet to the switch, so that the alarm zone will set up.
If you had to drill any switches to remove them, taping a magnet to them probably won't work. The internal reed switch is destroyed by drilling, and likely won't work with a magnet. In that case, cut the switch off of the wires, strip off about 1/2" of insulation from each conductor, twist them together, and secure with a wrap of electrical tape. This will close the loop for that switch, allowing the zone to set up normally.
You’re done with this phase of the DIY project!
The window crew will
remove any brackets for blinds that conflict with the new
windows. Also, today’s window and door installers tend to be very
familiar with alarm wiring. They’ll bring the reed switches out where
they need to be, so they can be re-attached easily.
Even though you’ve removed all sensors and magnets from the affected windows, you can continue to use your security system to protect any doors and windows not being replaced.
The switches you've removed and temporarily attached magnets to are basically bypassed. This will allow you to arm the system as usual, though the 'bypassed' sensors provide no protection.
Any
doors and windows not affected by the project will still be able to trigger an alarm, providing you
with a partial system until the project is complete.
When you're ready, you can move on to the next step:
Reed Switch Re-Installation DIY
For some examples of window and door sensors, see this page on Honeywell Switches.
If you haven't done so already, get a few Free Home Security Systems Quotes from companies in your area.
This will give you a good idea of what it would cost to have a system installed, as well as how much you could save by doing it yourself.
Return to Home-Security-Systems-Answers from Magnetic Reed Switches DIY Removal
Return to DIY Home Security Systems from Magnetic Reed Switches DIY Removal
Note: Feel free to print any of the articles on this site for personal, non-commercial use. Just look for this button:
If you found this website especially helpful, you might want to consider making a small donation. Since 2011, AzAlarmGuy has been providing free help and advice on home security systems to all of those in need.
Your gift, in any amount, will help me keep this website a free resource for anyone needing help with alarm system issues or questions.
Disclosure
I receive affiliate commissions from some of the companies and products I discuss. These commissions don't change the price that you pay.
Rest assured that this compensation does not influence my recommendations. I only endorse products and services that I truly believe to be an honest value for you, as a visitor to my site.
For more details, see my full disclaimer.


