- Home
- Compare Systems
- Cheap Systems
- Free Quotes
- DIY Systems
- Hardwired Systems
- Wireless Systems
- Smoke Detectors
- Medical Alarms
- Alarm Monitoring
- Cameras & Video
- Ademco
- ADT Security
- Brinks Security
- Broadview
- DSC Security
- FBI Alarms
- GE Security
- Honeywell
- Link Interactive
- Monitronics
- Moose
- Napco
- Protection 1
- Radionics
- Simplisafe
- Alarm Manuals
- Alarm System Parts
- Alarm Tools
- Troubleshooting
- FAQ
- Glossary
- Sitemap
- About Me
- Contact Me
How to Troubleshoot Alarm Panel Wiring
Finding and Fixing Intermittently Bad or Falsing Zones
Troubleshooting alarm panel wiring is probably at its most difficult when dealing with an intermittently open zone. A zone like this will usually set up normally, but cause random false alarms. This can become a frustrating problem for alarm owners, alarm technicians, and the police who respond to the false alarms.
Intermittent zones are usually due to a failing alarm switch, also known
as an alarm contact. Intermittent opens can also be caused by
misaligned magnets and contacts. This page explains in detail how to
find and fix these problems.
If
you’re having a problem with an alarm zone that’s ALWAYS
showing faulted on the keypad, check out "Burglar Alarm System
Troubleshooting - Solving Problems with Open Magnetic Contacts"
If you notice a door or window that NEVER displays as faulted on the keypads, even when it's open, see "Alarm Switch Troubleshooting - Finding and Fixing Lightning Damaged Alarm Contacts"
Identifying the Problem Alarm Zone
To fix any burglar alarm wiring issue, you must first know which
specific zone is having the problem. As I just mentioned, an intermittently faulty zone will often cause repeated false
alarms.
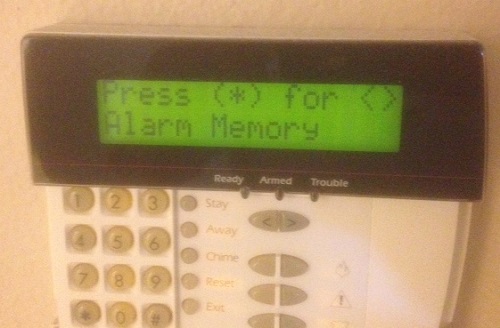
If this has happened in your case, chances are you already know which zone is the problem. If not, you can identify the problem zone using the security system’s "Alarm Memory" function.
All modern alarm panels have this feature, and its use is outlined in the User Manual. (Click here if you need help finding a copy of your alarm system user manual.)
If the system is monitored, you can also check with the
alarm monitoring company central station to learn the zone number and
description of the zone that caused any false alarms.
It’s also a good idea to have the central station put
that zone in “test” mode for at least a couple of weeks, to give you
time to track down and repair the problem.
Check Alarm Contacts and Magnets for Obvious Problems
Once you’ve identified the problem zone, start troubleshooting by
activating the alarm system's "Chime" or “Watch Mode” function. This
will cause the keypad(s) to sound a chirp or tone whenever a zone is
opened. The tone will help you to know if you have a switch that is
overly sensitive to slight movements of a door or window.
Checking Alignment
Begin
by looking for one of the most common problems, a magnet not aligned
correctly with its switch. While this usually causes a zone to show
faulted all of the time, slight misalignment can
sometimes cause zone faults that come and go.
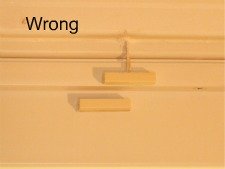
Good
alignment will have the switch and magnet lined up evenly, either
end-to-end for recessed contacts, or side-by-side for surface mount
switches. If there is any offset between the two, the magnet may not
trigger the switch correctly.
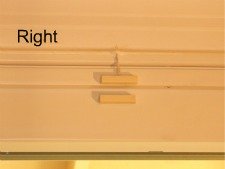
Good alignment also requires the
switch and magnet to be closely spaced without touching each other. Most
contacts will trigger reliably with a gap of ¼” to ½”. So-called
“wide-gap” switches will work well with up to ¾” of gap.
Checking for Loose Windows and Doors
Doors can sag, warp, and may not latch properly. Sliding and crank-out windows can get too loose or too tight in their frames. Both of these can result in a switch and magnet not lining up properly.
For
doors and crank-out windows, try pushing and pulling on the door or window itself, without turning the
doorknob or crank. For sliding windows, try to slide the window in both
directions against the closed latch. In either case, if you hear a chime
beep from a keypad, the latching mechanism is too loose to reliably keep the switch
and magnet in a close alignment.
If you do find a misaligned or widely spaced magnet and switch, remove
the magnet and re-mount it in the proper position. (For help
doing this, check out “Installing
Recessed Switches” and “Installing Surface-Mount Switches”)
Checking for Physical Damage
Damage often
occurs when a door or window is slammed hard, causing the magnet to hit
the contact or wiring. Recessed switches can sometimes back out of the
frame and get struck by the door or window. Water damage can happen if a
leak reaches the switch or wiring, causing corrosion and electrical
problems.
If you see clear signs of a damaged switch housing or
mangled/corroded wires, replacing the alarm contact should solve the
problem.
TIP:
If there is only a single magnetic contact or two on the affected zone
and it/they pass the visual inspection, consider simply replacing the
switch(es).
You’ll very likely fix the problem, and you can skip all of the following troubleshooting guidelines.
That being said, in my experience, a false alarm problem NEVER seems to happen on a zone consisting of just a switch or two...!
Checking for Thermal Swingers
If all contacts pass the inspections above, it makes sense at this point to test for a "thermal swinger". Before you go getting all excited, a “swinger” is an alarm industry term used for an alarm contact whose continuity varies, or swings. A thermal swinger does this in response to changes in temperature.
A switch that swings from
low to high resistance will be seen by the security panel as an open
zone, even though the door or window may actually be closed. If the
panel is armed when this happens, a false alarm is the result.
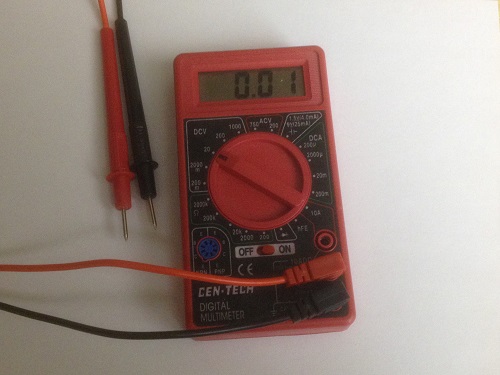
To test alarm
panel wiring, I like to use a digital multimeter, or DMM. Any basic DMM
can measure resistance, which is what we want to do here. The Harbor
Freight unit used for the photos here works well. The Extech model MN35
has a larger display and a few more features, and is available from
Amazon.com for around $20.
If
you don’t have a digital meter, an analog meter that can measure
resistance will work also. Before taking measurements, zero the analog
meter by shorting the meter probes together and adjusting the
calibration thumbwheel to read zero Ohms.
Along with a meter,
we need to thermally “shock” the switches on the problem zone with a
rapid temperature change. This will (hopefully) cause the bad switch to
change resistance and show itself.
In moderate or hot weather,
the easiest way to do this is with canned chiller spray. In colder
weather, a hair dryer can be used to warm up a switch and cause it to
fault.
To
begin testing, first disconnect the wires of the problem zone from the
alarm panel screw terminals. You'll be metering for resistance, which
must be done with the wires disconnected from the panel terminals.
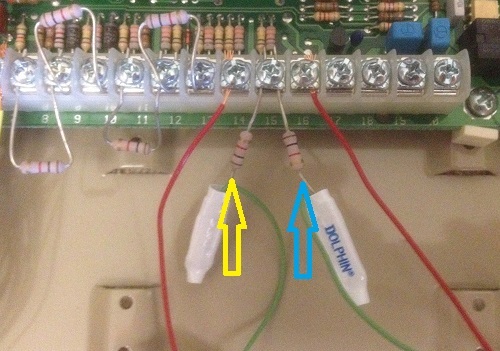
In the photo above, Zone 5 wires are on terminals 14 & 15. Zone 6
wires are on terminals 15 & 16. Terminal 15 is a "common negative"
for both zones. (The arrows point to the end-of-line resistors, explained in the next section.)
Most
alarm panel wiring layouts are designed with pairs of zones like these, sharing a
common negative terminal. The individual numbered zone terminals are
used for the "high" or positive voltage side of each zone or loop. The
negative side is a shared common terminal with the adjacent zone, and is
often electrically the same as the panel "ground" and battery negative
connection.
Dealing with End-of-Line Resistors
Some home security systems use “end-of-line” resistors, or
EOLR’s for zone supervision. These are shown on alarm wiring diagrams,
which are in the installation manual, and often inside the lid of the
main panel box.
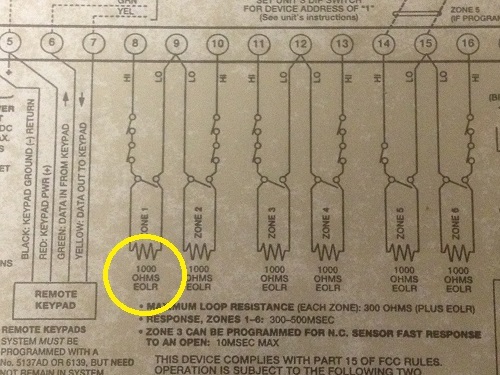
If your alarm panel wiring includes an
end-of-line resistor, meter only the wires, and do not include
the resistor. If the EOLR connection was made using a crimp connector,
you may find it easiest to uncrimp and remove it using a pair of pliers
or a crimping tool.
Find replacement resistors at Amazon.com.
If you have an older system that's starting to have problems, you may be thinking about replacing it.
To find out how much a new system might cost, get some free price
quotes from alarm dealers in your area. Just answer a few questions
below, and you'll receive your quotes via email.
These quotes are absolutely free!
Making Meter Connections
For these kinds of troubleshooting jobs, I recommend
making the meter connections with alligator clips or test leads with
screw-on clips. Simply holding the test leads by hand against the wires (as in the photo above)
allows movement, and will cause the meter reading to fluctuate. Since we
want to see only the fluctuations due to thermal changes, we
need solid connections that you don’t have to hold by hand.
If the alarm panel wiring is made up using crimp connectors, connecting the meter will be easier if you remove them. They can be un-crimped with pliers or a crimping tool, exposing the bare wires for connection. Or, you can simply cut them off, strip the insulation from the wires, and twist them back together.
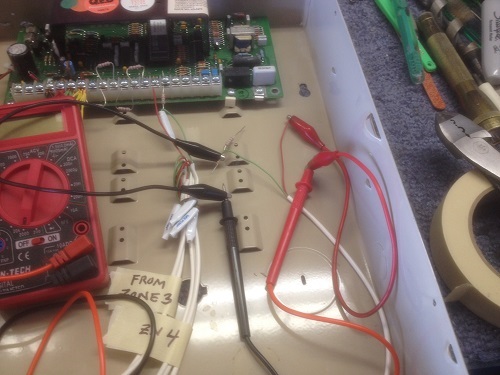
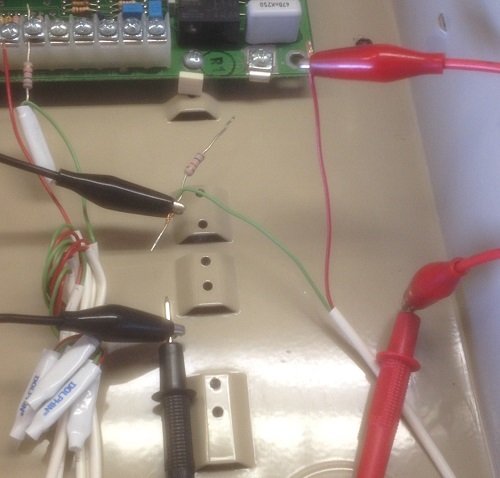
After meter connections are made, set the DMM or analog meter to measure resistance in Ohms.
Check to be
sure all openings on the affected loop are closed, then check the meter
reading. For a good loop, It should display from a few Ohms up to about
10-20 ohms maximum.
- Loops with many wires daisy-chained together, or zones located far from the panel location, will give the highest readings.
- Loops closer to the panel, and those with only a few wires, will show the lowest resistance values.
Make
a note of the reading, and the problem zone number. A copy of this note
should be left in the panel, to help you (or anyone else) with any
future troubleshooting that might be needed on this zone.
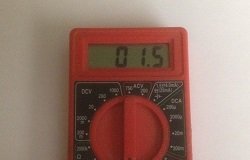
If you get a high reading of hundreds or thousands of Ohms, double check that all openings on the problem zone are closed. If the reading remains high, there may be an EOLR installed at a switch on that zone. Or, the problem switch could be acting up at this very moment. Either way, make a note of the resistance reading and zone number and continue to the next step.
Thermally Shocking the Magnetic Contacts
The next step is easier if you can convince, coax, or bribe a friend or family member to act as your helpful assistant.
One
of you needs to go to each affected door and window and chill (or heat
up) each switch. If you’re using freeze spray, blast each contact
directly with the spray for 3-5 seconds. You should see a layer of frost
form on the surface of the switch housing. For the hair dryer method,
direct hot air right onto the switch for 15-20 seconds.
The second person should watch the meter reading
continuously for at least 15-20 seconds after heating or cooling the
switch. A switch can sometimes take that long for any thermal changes to
happen.
If you’re working alone, no worries. Just apply the heat
or cold to the switch as described, then move as quickly as you can
back to check the meter reading. A bad switch will usually show
variations for up to a minute or so after being thermally shocked.
- When chilled or warmed, an alarm contact in good condition will vary in resistance by only an ohm or two, if at all.
- A failing contact will often display wildly fluctuating resistance
values, sometimes showing a completely open loop, which displays as
"OL" on many DMM’s. On an analog meter, the meter needle can swing way
up into the hundreds of Ohms or more. If you find a failing switch like this, pop the champagne! You’ve found the problem!
For a bad contact, pull
out the wiring connections of the offending switch. Where the switch
leads are crimped or soldered to the alarm wires, expose the joints down
to the bare wires. Then, twist or alligator clip the two sides
together. This will short-circuit the bad switch out of the loop until
you can replace it.
Continue to check all the alarm contacts on the problem zone, even if you have found a switch with a problem. It’s not unheard of to have more than one bad door or window alarm contact, especially on older alarm installations.
What to Do With More Difficult Cases
If you do find an obvious problem using
the steps above and you’ve replaced the switch, congratulations! You can
be reasonably certain that you’ve solved your false alarm problem.
If
you've found and corrected a not-so-obvious problem, like a
slightly misaligned magnet, you may not be sure it was the cause of the
issue.
In either case, if your system is monitored and you
haven’t already done so, you should definitely put the problem zone in
"test" condition with the central station for a couple of weeks or so.
This will prevent the police from being dispatched if the zone trips
again, and help you avoid possible false alarm fines.
Then,
resume normal use of the system. If no further problems occur within 3-4
weeks (or whatever time frame the false alarms were originally
occurring), you most likely have fixed the troublesome switch.
If the trouble recurs, or If your testing found no bad or damaged switches at all, here are some options:
If there are not too many switches on the problem zone, it may be easiest to replace them all and be done with it.
If
the problem zone has quite a few switches, or if they’re difficult to
reach or replace, you may be able to narrow down the bad switch using
the zone wires.
If the problem zone has only a single run
of wire, there’s not much you can do. You may just have to leave the
zone in test indefinitely, and wait for the problem switch to
deteriorate further so you can find and replace it.
Splitting Alarm Panel Wiring by Zone
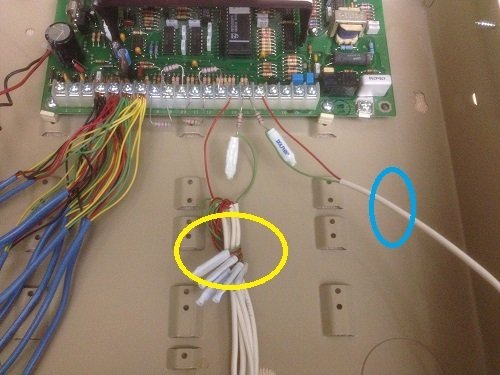
If the problem zone has two or more wires,
temporarily split off half of the wires on the problem zone onto another zone. Be sure both zones are programmed as the
same type (for example, a perimeter zone with no delay.)
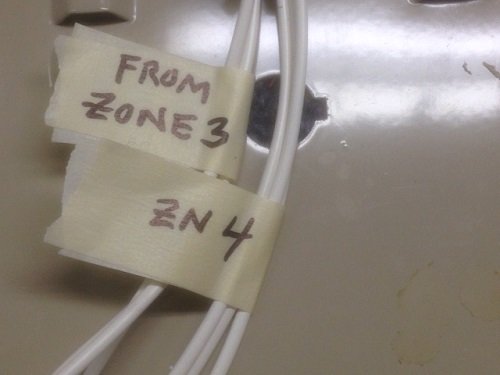
Tip:
When splitting up zone wiring, use masking tape or some other label to identify the wires you split off.
After the problem is found and fixed, this will allow you to put the wires back on their original zones.
For example, let’s say you’re having false alarms on Zone 2, the Family Room, which has 6 wires connected to it.
- Cut the Zone 2 wires into two sets of three wires each.
- Re-connect 3 of these back to Zone 2, including the EOLR, if used.
- Add the other 3 wires to the existing wires already on Zone 4, a Guest Bedroom.
Make
sure the system is in test with the central station (if your system is
monitored), and resume using the alarm. Then, simply watch for another
false alarm.
- If a false alarm occurs on the original zone (Zone 2), re-test those wires with the thermal shock method. If you still find no problems, split off 1 or 2 of those wires to the new zone (Zone 4), and wait for another false alarm.
- If the false alarm occurs on the new Zone 4, you know the problem lies with the 3 wires you split off. Re-test those wires; if no obvious troubles are found, divide these wires again, connecting 1 or 2 of them onto a third zone (Zone 5), marking them with masking tape as described above.
Using this "divide and conquer" technique, you
can identify the problem wire even if it doesn't false for days at a
time. Unless you have a fantastic memory, I strongly advise writing
yourself a few notes describing the steps you take while
troubleshooting.
At
some point, the window or door alarm contact having the problem will
degrade enough that you’ll find it while testing. When that happens,
replace the contact, and let the system run a while longer, just to be
sure. Assuming no further false alarms, you can restore the original
zone wiring connections using your notes and tape labels to reverse the
splits you made.
When you feel confident that the zone is in good
working order again, you can then take it out of “test” mode with the
central station.
Follow-up Steps for Troubleshooting Alarm Panel Wiring
Depending on what you found to be the cause of the intermittent zone, there are some steps you can take.
For a simple bad switch, replacement is the only action needed.
For a damaged switch and/or wiring, look for some way to prevent future damage. For example:
Recessed
door contacts sometimes get damaged because they become loose and pop
out of the jamb and into the path of the door. In this case, secure the
new switch in place with a dab of painter's caulk in the hole with the
switch. Use a piece of tape to hold the switch in place for 24 hours or
so until the caulking sets.
If switch wires were damaged, find a way to reroute them out of harms way.
Product Links
Component chiller spray
B-Connectors
Crimping Tool
Extech Digital Multimeter
Meter probes with screw-on clips
Alligator clips
Alarm Switches and Magnets
Surface-mount switches
Recessed switches
Related Articles
Alarm Switch Troubleshooting - Finding and Fixing Lightning Damaged Alarm Contacts
Removing Magnetic Door and Window Contacts
Installing Surface-Mount Switches
Installing Recessed Magnetic Switches
Return to Burglar Alarm System Troubleshooting from How to Troubleshoot Alarm Panel Wiring
Return to Home Security Systems Answers from How to Troubleshoot Alarm Panel Wiring
Note: Feel free to print any of the articles on this site for personal, non-commercial use. Just look for this button:
If you found this website especially helpful, you might want to consider making a small donation. Since 2011, AzAlarmGuy has been providing free help and advice on home security systems to all of those in need.
Your gift, in any amount, will help me keep this website a free resource for anyone needing help with alarm system issues or questions.
Disclosure
I receive affiliate commissions from some of the companies and products I discuss. These commissions don't change the price that you pay.
Rest assured that this compensation does not influence my recommendations. I only endorse products and services that I truly believe to be an honest value for you, as a visitor to my site.
For more details, see my full disclaimer.


